Home

Home

Sunday, June 18, 2023

misc photos

  • Slaving over a hot stove...soup, no doubt.


Saturday, January 18, 2020

Swedish Crescent


Chick Peas and Rice


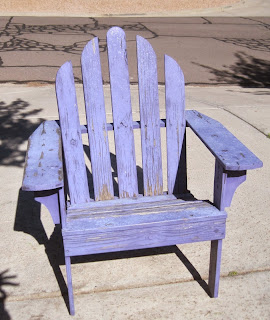
Before and after: free Adirondack chair

Before
After

Monday, June 19, 2017

Painted and stenciled farm table


Modernize old farm table


When I bought this table and 3 chairs at a county auction it was covered in flat black paint. This was covering a pretty blue, I guess because remnants of the blue sort of remained after all my hours of stripping the old black paint.
I have been using the table in its stripped-down state on my covered deck for about 15 years. It never any protective finish on it and has held up quite well. I recently painted another old piece, a secretary desk, that I primed 10 years ago, so I was on a roll for painting!
I've had a Cricut Explorer for a year and a half, but haven't used it much. This was about to change. Having recently repainted our balustrades, hubs filled me in on Crawford's light-bodied Vinyl Spackling Paste. I used this to fill some old cracks in the tabletop where planks had been joined together but separated over time. This was easy to do and I sanded it to a (roughly) smooth surface. I mean this table is about 100 years old so it's not gonna be smooth as glass. After priming and painting the entire surface with yellow (Oops paint toned down with white) I decided to make a border stencil to coordinate with my deck rugs. I taped off a 2-inch border and painted that white with paint I had.

The photo shows how I used additional cuts from the file folder to help maintain an even, consistent line as I went along.

This was not supposed to happen.
In this one spot the yellow paint completely lifted when I removed the tape. Don't know what caused it but was thankful it was just this one small area. I touched it up with yellow paint toward the end.
learning curve...my first method wasn't going to make it for the long haul.
After creating my stencil on the Cricut, I cut it from a manilla file folder. Once my 2-inch white boarder was complete I removed the blue painters' tape.

Using a flat stencil brush I used Benjamin Moore, color Lucerne, paint from a previous project (painted Bistro chairs) to pounce the color on after having tapped it on a paper towel to remove the bulk of the paint. Using a very slight amount of paint prevents the paint from bleeding underneath the stencil.

I used the bottle top from orange juice for my paint.
Since I didn't have any repositionable adhesive, I used a very old ( I mean VERY old) roll of drafting tape to tape down the stencil. I then painted the part below the tape. The paint drys very quickly, so before I removed the first tape, I put a different piece of tape over the painted part so the stencil wouldn't shift.

Then, I removed the first tape and painted the upper portion. Using the re-positional adhesive would eliminate this step and would move things along more quickly. Additionally, having a longer stencil would also speed the process, but I was limited to the length of my 12" Cricut mat.

To ensure a nice continuous pattern align one of the motifs with an already painted one. Continue in this fashion around the table perimeter.

Work in progress with the array of equipment used.
Ta dah!

I'm very pleased with the way this turned out. I taught myself how to make a usable stencil and it basically cost me nothing as I had all the materials on hand. It was fun to see my idea devlop.

Friday, March 3, 2017

Salmon quiche

Recipe:

Tuesday, September 27, 2016

Our house